Thank you to everyone that participated in our October Apple Challenge. Fall is all about apples so I'm glad they didn't go to waste! Looking forward to November.
Saturday, October 31, 2009
Thursday, October 29, 2009
I'm Caught Up - Apple Pie!
Posted by - Gerri
I'm finally caught up with the Have the Cake blog. This evening I made the apple pie and have a few more day to knock out the boscotti.
I altered the "Gingery Apple Crumb Pie" recipe in the November 2009 issue of Real Simple. http://http//www.realsimple.com/food-recipes/browse-all-recipes/gingery-apple-crumb-pie-recipe-00000000022648/index.html.
This recipe calls for a flour bottom with a crumb topping, but I used a Crisco-based flour crust instead.
I used a ginger spread instead of the grated ginger and used Rome apples instead of Granny Smith.
I also sprinkled some dark brown sugar over the apple mixture before putting on the top crust.
It was simple enough and I like the sublte ginger flavor. Now, if Tom hadn't eaten all the Ciao Bella Tahatian Vanilla Gelato, I'd have something really good to go with this!
Monday, October 26, 2009
Pumpkin Apple Pie
If you had to choose something to eat every day for the rest of your life, what would it be?
Serves 8, adapted from the Whole Foods website
1/3 cup light brown sugar
1 tbsp cornstarch
1 tsp cinnamon, divided
1/2 tsp salt, divided
1/3 cup water
2 tbsp butter
2 granny smith apples, peeled, cored, and thinly sliced
1 egg
1/3 cup sugar
3/4 cup canned pumpkin puree
1/4 tsp cloves
1/4 tsp ginger
3/4 cup evaporated milk
1 (9-inch) unbaked pie crust
1. Preheat oven to 425°F. Put brown sugar, cornstarch, 1/2 teaspoon of the cinnamon, 1/4 teaspoon of the salt, water and butter into a medium pot and cook over medium heat, stirring constantly, until mixture comes to a boil. Add apples and cook, tossing to coat in sugar mixture, 3 to 4 minutes more. Remove from heat and set aside.
2. In a large bowl, whisk together egg, granulated sugar, pumpkin, remaining 1/4 teaspoon salt, remaining 1/2 teaspoon cinnamon, cloves, ginger and milk until well combined.
3. Pour apple mixture into pie shell then spoon pumpkin mixture evenly over the top. Bake for 10 minutes then reduce temperature to 375°F and bake until filling is just set in the middle, about 40 minutes more. Set aside on a wire rack to let cool completely then cut into slices.
The only reason I am asking is that when Justin came over to have a piece of this pie, he said that his dish of choice would be pumpkin pie. Hands down. No questions asked.
I have never seen someone so passionate about a baked good before.
So then I started thinking about it. And I would be really hard-pressed to choose.
My favorite desserts are ice cream, tiramisu, and bread pudding. But every day? From now until eternity? Ever and anon?
Maybe not dessert then. Maybe something savory is more in order. Lasagna? Ravioli? Sweet potatoes?
But would any of these be worth not ever having dessert again? It's a vicious cycle. Not gonna lie.
When I found out that this month's Have the Cake recipe was apple pie, I was really excited. But also kind of nervous. As I have noted before, pies are hard. The filling needs to be just the right consistency, homemade crust is kind-of a pain to make (who really knows how to "cut in butter" anyway?), there's a fine line between the pie being too sweet or completely lackluster in the flavor department, etc.
Or maybe I'm just a worrier at heart.
Very likely.
But when I saw this recipe for Pumpkin Apple Pie on the Whole Foods website that had gotten rave reviews, all of my anxieties and hang-ups went out the window. Sometimes you've just gotta jump in feet first, I thought. Things may turn out badly. But then again. Maybe not.
And sometimes, that's a risk you just have to take.
(Note to self - trying to philosophize on life through pie metaphors may seem like a good idea at 6AM but you should prepare yourself for the possibility that you may cause other people to think you are on crack.)
The pie was actually really good, though. It was an ideal combination of my favorite fall produce. Which, between the two, I probably do actually eat every day. What with the 12 pounds of winter squash and all. And the 5 lb bags of apples that Sophie and I keep buying. It's a tough life but someone's gotta eat it.
Pumpkin Apple PieI have never seen someone so passionate about a baked good before.
So then I started thinking about it. And I would be really hard-pressed to choose.
My favorite desserts are ice cream, tiramisu, and bread pudding. But every day? From now until eternity? Ever and anon?
Maybe not dessert then. Maybe something savory is more in order. Lasagna? Ravioli? Sweet potatoes?
But would any of these be worth not ever having dessert again? It's a vicious cycle. Not gonna lie.
When I found out that this month's Have the Cake recipe was apple pie, I was really excited. But also kind of nervous. As I have noted before, pies are hard. The filling needs to be just the right consistency, homemade crust is kind-of a pain to make (who really knows how to "cut in butter" anyway?), there's a fine line between the pie being too sweet or completely lackluster in the flavor department, etc.
Or maybe I'm just a worrier at heart.
Very likely.
But when I saw this recipe for Pumpkin Apple Pie on the Whole Foods website that had gotten rave reviews, all of my anxieties and hang-ups went out the window. Sometimes you've just gotta jump in feet first, I thought. Things may turn out badly. But then again. Maybe not.
And sometimes, that's a risk you just have to take.
(Note to self - trying to philosophize on life through pie metaphors may seem like a good idea at 6AM but you should prepare yourself for the possibility that you may cause other people to think you are on crack.)
The pie was actually really good, though. It was an ideal combination of my favorite fall produce. Which, between the two, I probably do actually eat every day. What with the 12 pounds of winter squash and all. And the 5 lb bags of apples that Sophie and I keep buying. It's a tough life but someone's gotta eat it.
Serves 8, adapted from the Whole Foods website
1/3 cup light brown sugar
1 tbsp cornstarch
1 tsp cinnamon, divided
1/2 tsp salt, divided
1/3 cup water
2 tbsp butter
2 granny smith apples, peeled, cored, and thinly sliced
1 egg
1/3 cup sugar
3/4 cup canned pumpkin puree
1/4 tsp cloves
1/4 tsp ginger
3/4 cup evaporated milk
1 (9-inch) unbaked pie crust
1. Preheat oven to 425°F. Put brown sugar, cornstarch, 1/2 teaspoon of the cinnamon, 1/4 teaspoon of the salt, water and butter into a medium pot and cook over medium heat, stirring constantly, until mixture comes to a boil. Add apples and cook, tossing to coat in sugar mixture, 3 to 4 minutes more. Remove from heat and set aside.
2. In a large bowl, whisk together egg, granulated sugar, pumpkin, remaining 1/4 teaspoon salt, remaining 1/2 teaspoon cinnamon, cloves, ginger and milk until well combined.
3. Pour apple mixture into pie shell then spoon pumpkin mixture evenly over the top. Bake for 10 minutes then reduce temperature to 375°F and bake until filling is just set in the middle, about 40 minutes more. Set aside on a wire rack to let cool completely then cut into slices.
Wednesday, October 21, 2009
Apple Pie with Piper
October was my month to choose the Have the Cake challenge, and I chose apple pie. You can read the challenge here.
I've made many apple pies over the past ten years, so I can pretty much do this in my sleep. The only problem - no lard for the crust. :( Yes, after making such a huge deal about the lard, I had to make a butter-based crust because the bucket of lard in the pantry had a sell-by date of July 2009. Could I have used it? Probably. (Can lard ever go bad?) But, I'm not a girl who takes chances with expiration dates.
I made a peach pie earlier this month, which turned out okay, but not great because I used frozen peaches instead of fresh. I'd made a full crust for that pie, so I felt lazy when I got to this pie. I'd been meaning to try a lattice top this time like Tina made, but instead went with my traditional streusel top.
Tuesday, October 20, 2009
Gran's apple pie... kind of
I love apple pie. Warm, with vanilla ice cream. YUM. So this month made me very happy.
I used the Joy of Baking Recipe, but really liked the post about crumble on top, so thought I'd try that.
Mistake #1.
Then I really liked Laura's description of using lard to make a light flaky crust.
Mistake #2.
I gathered about 10 apples, 4 different varieties, and peeled, quartered, sliced and nibbled on them until I had a full bowl. Then I left them to marinate whilst I attempted to (to use Laura's words:) throw flour at lard until it looks right.
Ok. Ick. The lard was slightly chilled (as it had sat in the refrigerated grocery delivery truck for a while, apparently), and I couldn't get it to mix, so I used my hands. At first I kinda liked the feeling between my fingers. That lasted about 20 seconds before I started to get seriously grossed out. And there was nothing resembling dough appearing in the big old bowl, despite the growing dust cloud of flour encroaching across my kitchen. Add to that the smell of lard... and I was not a happy bunny. But I kept trying to make it work by adding more flour. I thought at this point about the crumble topping and even thought I'd try that recipe. Then I realized that I'd used almost an entire bag of flour and the whole stick of lard and ended up with a dusty, greasy bowl full of lumpy nothingness and a fine white mist of flour covering half my kitchen.
I officially gave up at that point and went out for brunch with a girlfriend. :)
I came back several hours (and glasses of wine) later with ready made pastry crusts and finished the pie.
I'm honestly surprised that I had enough apples to make a pie, as I discovered that they are SUPER YUMMY after marinating in the spices for several hours and ate them by the handful as I was cutting the strips for the top of the pie. I decided I'd just do the criss-crossy top like my Gran used to make because I love it. I love the way it looks, and since the crust is my least favorite bit, it's a win/win. The whole crumble idea seemed a distant [hic] memory. :)
Here it is: MY SUPER YUMMY APPLE PIE! (which only baked for about 30 minutes instead of the whole 45 because apparently my oven thinks 220 degrees celcius is a tad hotter than the folks at Joy of Baking... thank gawd for tin foil!)
Sunday, October 18, 2009
Mom's Dutch Apple Pie
Right before Laura posted that apple pies would be October's Have the Cake challenge, Todd and I had planned an apple-picking outing. We were headed to Stuart's Farm, a family fruit farm an hour or so outside of NYC with Dylan and Sofia, as well as Dylan's friend and his friend's dad and sister.
The farm has nine varieties of apples, three or four of which can be seen in this picture. I mixed and matched them for my pie, trying for a nice combo of sweetness and tartness.
I 've been eating and loving my mom's dutch apple pie my whole life, and despite getting into baking the last few years, I had never tried to make it on my own. This seemed like the perfect time! My mom sent me the recipe for the filling and the crust that both she and my Nana used whenever they were making one from scratch. I like the family history aspect of being at least the third generation to use a recipe. :)
Mom's found over the years that the pie gets too soggy if you don't let the apples sit in their sugary goodness for a while before loading into the crust. After sitting for a while, just enough of the apple juice comes out to save you from a soggy bottom. So I started there. Here's the first of my slied apples in the sugar mix.
I moved on to the crust next. I struggled a little bit rolling it out, as it crumbled a little around the edges. Mom warned me that the trick with this crust was to put all the ingredients in the freezer before using them. Apparently making them ice-cold saves the crumbling. I did that with everything but the milk. Our freezer was just too full for me to find a way to get it all in there. I think if I'd really followed Mom's directions, instead of just 3/4 of them, it would have been even easier. I had to work a little harder my way, but in the end the crust was rolled out well enough and tasted good to boot, so I'll take it.
So here is the final product, complete with hand-picked apples, homemade crust, and yummy sugary/buttery crumbles on top. We ate it that night with whipped cream and/or vanilla ice cream. Both Todd and Dylan went for seconds, so it's safe to say that it was a hit!
Saturday, October 17, 2009
October Challenge: Apple Pecan Tart
So I was going to make the Joy of Cooking website's apple pie..bought all of the stuff at the store and everything, but then I just didn't feel up to making the crusts, so I went searching for a recipe for a tart...it's basically the same thing as a pie, and hey, I haven't used my brand new pampered chef tart pan! I found a recipe at the NY times for Apple Pecan Tart and OMG am I glad I changed my mind, though the whole process seemed like an exercise in FAIL at the time. Process, pics and recipe after the jump:
Peel, core and slice apples..
Sautee in butter until they start to brown.
Stir in brown sugar and chopped pecans, sautee one minute more.
Roll out pie crust and flute edges.
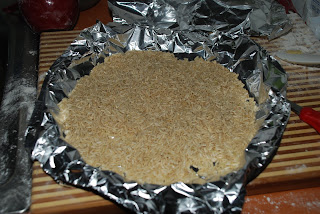
Line crust with foil, then fill with beans, rice, etc to weight crust. Baked for 10 minutes..then remove from oven and bake for 20 minutes until golden. This is where the FAIL started...the crust SHRANK. I don't know why, but it shrank a lot.
You can see it here...but still I pressed on. Put the apple mix in the pie shell.
Whisk eggs, maple syrup and vanilla.
Here is the next place where I was struck by FAIL. Poured the syrup mix into the shell. Watched it overflow. At this point there was nothing I could do about it but hope for the best.
Bake 10 minutes at 400 then lower heat to 350 and bake another 20 minutes until golden. It actually came out pretty well.
Plated with fresh whipped cream...this tart of mine may not win beauty pageants, but OMG did it taste good...like pecan pie with apples. Try this!
Tuesday, October 13, 2009
Apple Tart
This is the most delicious combination of apple and cheesecake and tart. It is from the Joy of Baking. I do get some of the best recipes from there. They all work which is a good starting point. They, so far, have all been delicious.
I hope a tart is close enough to an apple pie. I have loads of apple cakes I have been making. Apples are in.
With my hesitation with pies and crusts, this one is a cinch. Really, it is made in the food processor. What a cinch, it was, for me. I am thankful.
This came from my other blog Chaya's Comfy Cook Blog which is gluten free, thus this is gluten free, as well.
CRUST:
1 cup (140 grams) gluten free flour mix
1/3 cup (35 grams) confectioners (powdered or icing) sugar
1/2 cup (1 stick) (113 grams) cold margarine, cut into small pieces
1 cup (140 grams) gluten free flour mix
1/3 cup (35 grams) confectioners (powdered or icing) sugar
1/2 cup (1 stick) (113 grams) cold margarine, cut into small pieces
FILLING:
One 8-ounce (227 grams) cream cheese, at room temperature (I used Tofutti cream cheese)
1/4 cup (50 grams) granulated white sugar
1 large egg
1/2 teaspoon pure vanilla extract
TOPPING:
1/4 cup (50 grams) granulated white
1/2 teaspoon (2 grams) ground cinnamon (I used more cinnamon – 1 1/2 teaspoons)
4 cups (500 ml) Granny Smith apples, peeled and cut into 1/4 inch (.6 cm) slices (about 3-4 large apples)
1/3 cup (35 grams) sliced almonds
Method:
Preheat oven to 450 degrees F (230 degrees C) and place rack in center of oven. Grease (or spray with Pam) a 9 inch (22 cm) springform pan.
CRUST: In the bowl of your food processor place the flour and sugar. Pulse to blend together. Add butter and pulse until dough just begins to come together. Pat the dough onto the bottom and one inch (2.5 cm) up the sides of the pan. Cover with plastic wrap and place in refrigerator while you make the filling.
FILLING: In a food processor process the cream cheese until smooth. Add the sugar and mix well. Blend in the egg and vanilla extract and process until smooth. Remove the crust from the fridge and pour in the filling. Return to refrigerator while you prepare the topping.
TOPPING:
Combine the sugar and cinnamon in a large bowl. Toss the sliced apples in the sugar mixture. Spoon the apples evenly over the cream cheese layer and sprinkle with almonds. Place the springform pan on a larger baking sheet to catch the drips.
Bakeat 450 degrees F (230 degrees C) for 10 minutes. Reduce heat to 400 degrees F (205 degrees C) and bake for 25 to 30 minutes until golden brown (apples are soft when pierced with a fork), and filling is almost set. Remove from oven and place on wire rack to cool. Sprinkle with confectioner’s sugar and serve at room temperature.
Each layer is delicious. This is the most delicious combination of apple and cheesecake and tart. It is from the Joy of Baking. I do get some of the best recipes from there. They all work which is a good starting point. They, so far, have all been delicious.
I Heart Apple Pie!
So, I am ashamed to admit that I have never, ever made an apple pie before. I am ashamed because I live in Western New York where apples not only abound but much of the area spends the whole Fall throwing apple festivals and every person I know makes a huge deal about picking weekends and baking extravaganzas. I have also never liked apple pie...until now.
After perusing a million recipes online, I finally decided to just pull out my Betty Crocker cookbook and just go basic. I bought four different apple varieties to try and achieve the perfect sweet, tart apple yummy-ness (Macintosh, Empire, Jonamac and Braedon).
I peeled, cored and thinly sliced.
I also munched a lot on these along the way...
and so did my dog.
I was most nervous about making the crust so I did a bottom crust only and made a crumble for the top. I figured if the crust was bad, at least there would be some good sugary sweetness on top. The process was super-easy and it rolled out nicely. I didn't look perfect but I can live with that.
Since I was an apple pie newbie, I did not tweak a whole lot of the recipe. The only change I made was substituting some of the white sugar with dark brown sugar. The end result-love! I loved this pie. It cooked up perfectly. The crust was delicious and perfectly golden. Bonus-my house smelled AMAZING.
Apple Pie
6 cups thinly sliced, peeled cooking apples (2 1/2 lbs.)
1 tablespoon lemon juice (optional) I didn't use this.
3/4 cup sugar
2 tablespoons all-purpose flour
1/2 teaspoon ground cinnamon
1/8 teaspoon ground nutmeg
Preheat oven to 375 degrees. Prepare an roll out pie crust**
**Pie Crust
1 1/4 cups all-purpose flour
1/4 teaspoon salt
1/3 cup shortening (I used butter-flavored Crisco)
4-5 tablespoons water
Stir together flour and salt. Cut in shortening until pieces are pea-sized. Sprinkle 1 tablespoon of water over part of mixture. Toss with fork. Push moistened crust to edge of bowl. Repeat until all mixed. Roll out. Wrap around rolling pin and lay in pie tin. Trim as desired.
Sprinkle apples with lemon juice. In large bowl, stir together sugar, flour, cinnamon and nutmeg. Add apple slices. Gently toss until coated. Tranfer apple mixture to pastry-lined pie plate. Sprinkle crumb topping (1/2 cup flour, 1/2 cup sugar and 3 tablespoons butter mixed until resembles course crumbs) over top. Cover with foil and bake for 40 minutes. Remove foil. Bake for an additional 20 minutes or until fruit is tender and filling is bubbly. Let cool at least two hours before serving.
A Tale of Two Apple Cakes
Well, I made a whole lot of work for myself this month. Thankfully, there are apples everywhere so I had enough on hand to make two desserts. Since Laura left this month's challenge open to interpretation (check the comments on her challenge post) I decided to make cake.
I found this recipe for Overnight Apple Cake about a year ago and have been dying to make it. It's so simple but I didn't want to leave the oven on overnight so I started baking around 8am and figured by evening, I'd have my cake (and eat it too!). The cake was a success even though it was too thin but it really tastes like a baked apple when all is said and done. It's not really worth waiting 12 hours for but I'm glad I tried it because I would have never known.
With that disappointment, I decided to attempt for a second time a recipe that I found on one of my most favorite food blogs called Alexandra's Kitchen. I made this cake about a year ago but I was working with a horrible oven at the time. It took way too long to bake and I wasn't sure it was even done. My friends and fellow htc bakers, Tori and Laura, both tried it and said it was delicious and survived to tell the tale. I made it again this morning and am very pleased with my new oven. The cake is moist and delicious. I think I need a deeper pan for it to come out right but I'm pleased with it as is.
Last year when I made this cake, I had never purchased vanilla beans before. I was shocked to find out that the local health food store charged $3.50 for ONE! Yikes. I started doing some research and found The Organic Vanilla Bean Company on ebay. They are incredibly cheap and they last forever.
I'm going to go eat another slice for lunch.
Click here to get the recipe from Alexandra's Kitchen.
Friday, October 9, 2009
Sue's "famous"apple pie
That's what one of my nieces calls it, anyway, probably because it's my annual contribution to Thanksgiving dinner. I was trying to remember when I first started making pies and I think I was probably in my late teens or early20s, so 40 years is a legitimate guess.
My apple pie is pretty straight forward stuff. No thickening, and no streusal, no fancy flavors. It's the "Plain Jane" of pie-dom.
I've tried many different pie crust recipes over the years. but I always come back to a basic one that I've used forever. Back in the 70s there was a publication called The Grande Diplome Cooking School; they were a series of paperbacks that came out in the grocery store once a week, and took the novice cook from the basics to progressively more advanced and intricate recipes. Their pie crust recipe is still the best.
Put 2 cups of flour in a large bowl. add 1 tsp. salt and stir to mix. With a pastry blender, cut in 1/3 cup of butter and 1/3 cup Crisco. When all the shortening has been incorporated add 1/4 cup very cold water and mix with a fork. Once the dough begins to pull together I use my hands to finish mixing. If the dough feels too dry, add more water 1 tsp. at a time. Caution - becareful not to add more than ateaspoonat a time as you could end up with wet, sticky dough! When the dough forms a firm ball, divide it in half, wrap in plastic and chill for 1/2 hour. This helps to rest the dough and prevents shrinkage later.
While the dough is chilling I peel, core and slice the apples. I cut them into a 10" bowl - when the bowl is full you have enough apples for a 9" pie. I don't like an overly sweet apple pie, so I'm a little stingy on the sugar, I also use light brown sugar, as opposed to white,because I find it gives the pie a deeper, richer flavor.
I just dump the sugar onto the apples until it looks "right", but I probably end up with about 3/4 cup UNpacked sugar. I used MacIntoshes for this pie, but for tarter apples I'd probably dump in a little more sugar. Next comes a couple of healthy shakes of cinnamon and a pinch or so of nutmeg.
Once the pie crust has chilled roll out the bottom, dump in the apples and cover with the top crust. I cut a few vents in the top, sometimes using my "Martha" to make fancy design.
Place the pie in a preheated 425 degree oven for 15 minutes. This helps set the dough so that you don't end up with a soggy bottom crust. Reduce the heat to 350 and bake for another 40 minutes. Cool the pie for at least 2 hours before cutting.
What you end up with is a pie with a dense filling of well cooked apples.
So, as Julia always said, Bon Appetit!!
Thursday, October 1, 2009
October Challenge: Apple Pie
Those who know me are going to be shocked that I'm posting a challenge that doesn't involve copious amounts of chocolate, but it is impossible to ignore apples in October. I have a special place in my heart for apple pie, as it is the only recipe my grandmother ever taught me to make before she passed away. I lived in Manhattan after college, and one of my friends took me apple-picking in upstate New York the first fall I lived there(thanks Pete!). I came home with way more apples than I knew what to do with. So, I got on the phone to my grandmother in Colorado and she walked me through making the crust (after a trip to the 3rd Avenue A&P to search for lard), the filling, and the streusel topping. I made four apple pies that night and proudly distributed them at work the next day. Every year since, I try to make a couple of apple pies in the fall.
I'll leave the recipes up to you all, since my recipe goes like this: for the pie crust, throw flour at a stick of lard until it feels right; for the filling, pile cinnamon and sugar and brown sugar on top of sliced apples until it looks right, and cover the whole thing with streusel - a mixture of a stick of butter, a cup of sugar, and a cup of flour chopped together with a knife. (Now can you see why I'm advising you to choose your own recipe?)
I know it disgusts some people, but I can't stress enough the difference lard makes in getting a flaky pie crust. :) Can't wait to see what you guys come up with, and I'm looking forward to lots of photos of delicious looking apple pies...
Subscribe to:
Posts (Atom)